Important Information
- Uploading grades allows users to load electronically-maintained grades into the Faculty Center grade roster rather than manually entering each individual grade.
- Grade rosters must be generated before uploading grades.
- Grade rosters for full term classes are generated in the afternoon, on the day after the last day of classes of the term. Classes that meet less than the full term (first half, second half, and mini courses) will have their grade rosters generated on the Friday of the week the class ends.
- Grade roster upload is available to:
- Instructors, faculty graders, and graduate instructors assigned to the class in M-Pathways with one of the following levels of access:
- GRADE access allows you to enter or upload grades and then set the Grade Roster Approval Status to ‘Ready for Review.’ Instructors with this role cannot approve or change grades. This level of access is recommended for classes with one or more instructors assigned and/or for classes with multiple components.
- APPROVE access allows you to enter grades, upload grades, or review grades already entered. Once the grades are reviewed for accuracy, you can set the Grade Roster Approval Status to Approved. Clicking Save and viewing the Grade Roster Submittal Confirmation that appears on the bottom of the Grade Roster page are the final steps. This level of access is recommended when only one instructor is responsible for all aspects of grading. o
- Staff who are assigned one of the following levels of proxy access in the Faculty Center by a class instructor with GRADE or APPROVE access:
- Enter Grade Proxy access allows you to enter or upload grades and then set the Approval Status to Ready for Review. Proxies with this role cannot approve or change grades.
- Approve Grade Roster Proxy access allows you to enter grades, upload grades, or review grades already entered. Once the grades are reviewed for accuracy, you can set the Grade Roster Approval Status to Approved. Clicking Save and viewing the Grade Roster Submittal Confirmation that appears on the bottom of the Grade Roster page are the final steps.
- Instructors, faculty graders, and graduate instructors assigned to the class in M-Pathways with one of the following levels of access:
Prepare Upload File
- Prepare the grade file for upload. File types include:
- Windows CSV (Comma Separated Value)
- Windows XLS or XLSX (Excel)
- If you use a Macintosh, save the .xls, .xlsx, or .csv file as a Windows file version. Macintosh .csv, .xls, or .xlsx files will result in an error.
- You can export the grade or class roster information to Excel, This provides you with an electronic copy of the students enrolled in the class section.
- An upload file should contain only two columns, one for UMIDs or uniqnames, and one for grades. Headings, extra information, and any type of formatting prevents a successful upload.
- Excel cells must be formatted using the “General” category on the Number tab. Any other format category (i.e., “Special” or “Custom”) causes upload errors.
Navigation
Wolverine Access > Faculty Business
Step-by-Step Process
- Click Faculty Center.
- If necessary, click Change Term to select the appropriate term.
- The Faculty Center page defaults to the current term.
- Locate the appropriate class in the Class and Class Title fields.
- Only classes for which you have been set up as an instructor or assigned as a proxy are viewable.
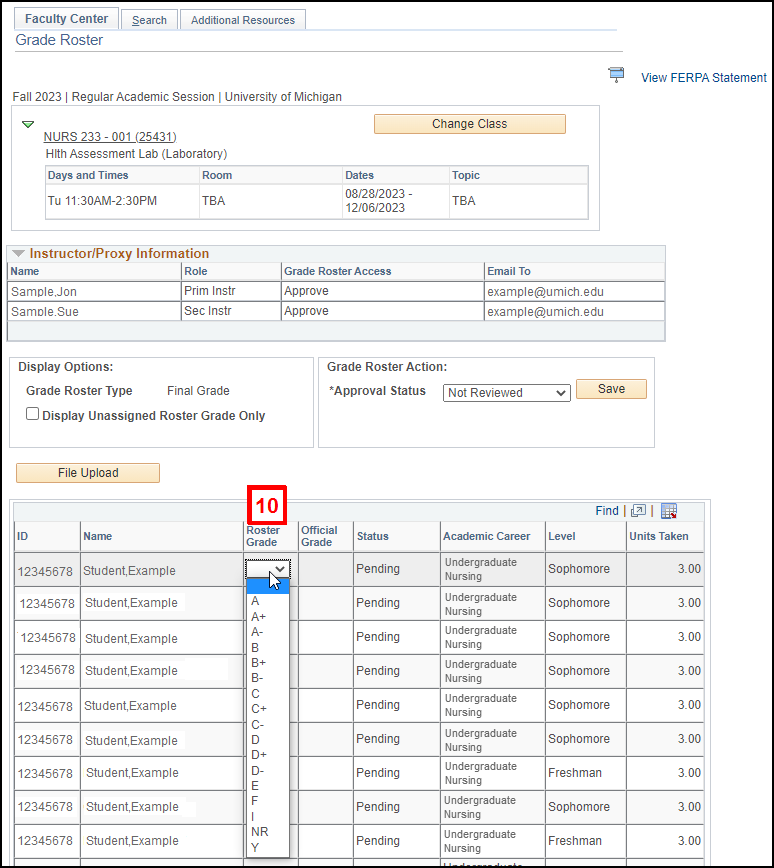
- Click the Grade Roster
 icon located to the left of the class name.
- Grade roster icons appear only when there is a grade roster generated for the class.
- Click File Upload.
- Click Browse.
- Click Upload.
- Review the Upload Summary and click OK.
- If applicable, upload error messages will appear in the Upload Summary. Refer to the Grade Roster Upload File Requirements and Upload Errors Support Material for more detailed information.
- Review the uploaded grades and fix any errors.
- A duplicate student UMID or uniqname on the upload file will result in grade input errors (i.e., a student is registered for more than one class or class section assigned to an instructor.)
- Always review uploaded grades for accuracy and check for errors before saving or approving the grade roster.
- Refer to the Grade Roster Upload File Requirements and Upload Errors Support Material for additional information.
- No - skip to step 13.
- Yes - continue to step 11.
Did you enter a failing or NR grade?

- If you entered a failing or NR grade, select the student’s level of class participation in the Level of Participation field.
- Full – student attended class and completed assignments
- Never – student never attended class or completed an assignment
- Partial – student attended at least 1 class or completed at least 1 assignment, including:
- Written and/or verbal conversation between the instructor and student about the course.
- Participation in a discussion on Canvas.
- Completion of a paper or examination.
Note: Participation for these purposes is defined not by the quantity or quality of participation, but by the student's last participation. Example: A student could never attend class, but if they take the final exam, the Level of Participation is Fully Participated.
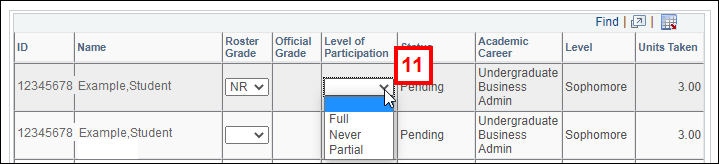
- If ‘Partial’ is entered as the student’s level of participation, enter the date the student last participated in the class in the Last Date of Participation field.
- Partially graded rosters should be saved with an Approval Status of Not Reviewed or Ready for Review. When a grade has been entered for each student, you can change the Approval Status.
- Change the Approval Status. The valid values include:
- Ready for Review – submits the grade roster to the instructor with APPROVE grade roster access.
- An automatic email is sent to both the Grader and the Approver(s) indicating the roster is ready for review.
- Instructors with GRADE grade roster access should select this option.
- Once this option is selected, only the instructor with APPROVE grade roster access can modify the grade roster.
- Approved – submits the grade roster for posting to the student record.
- An automatic email is sent to all Approvers on the grade roster to confirm the grade roster has been approved and submitted.
- This option is available only to instructors with APPROVE grade roster access.
- Ready for Review – submits the grade roster to the instructor with APPROVE grade roster access.
- Grades can be entered, uploaded, or modified only when the Approval Status is set to Not Reviewed.
- Instructors with APPROVE grade roster access can change the Approval Status back to Not Reviewed to make modifications to the grade roster before the grades are posted. See the Review and Approve Grades for more information.
- Click Save.
Notes:
Grade Roster Action screenshot
